
Service Records
The service record allows the mobile user to record a description of their work, labor hours, material charges, images and private notes to the Job. All mobile technicians should be recording a service record at the end of their work. Anytime you complete work and intend to clock into a new job, you need to create a service record and record what you did while working.
It is important that service records are completed, and the data provided is accurate. Service Records are a way for the mobile user to document what they did in the form of text and images to protect both themselves and the contractor.
Service Record Data
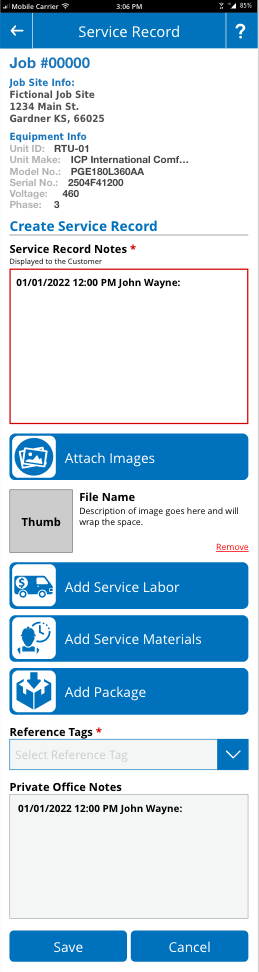
At the top of the service record screen will be some basic data about, the job and the equipment you are completing the record on. Service records should be created pertaining to the individual equipment that you are working one unless your work is too general that it will pertain to multiple equipment where it should then be recorded under the Jobsite equipment.
Service Record Notes (Public)
The point of the service record is to record notes explaining what you have been doing on the job your completing. Service record notes can be based on work you did on a single piece of equipment or work you did on the Jobsite. Your notes should be detailed but not too extensive. Keep your notes to the point and provide any details that are relevant to explaining your time working on the job.
It is important that you understand that these notes are public. This means that Customers and Clients can and often do get a copy of your notes so the Contractor can explain why they are being billed for your work.
Attaching Images
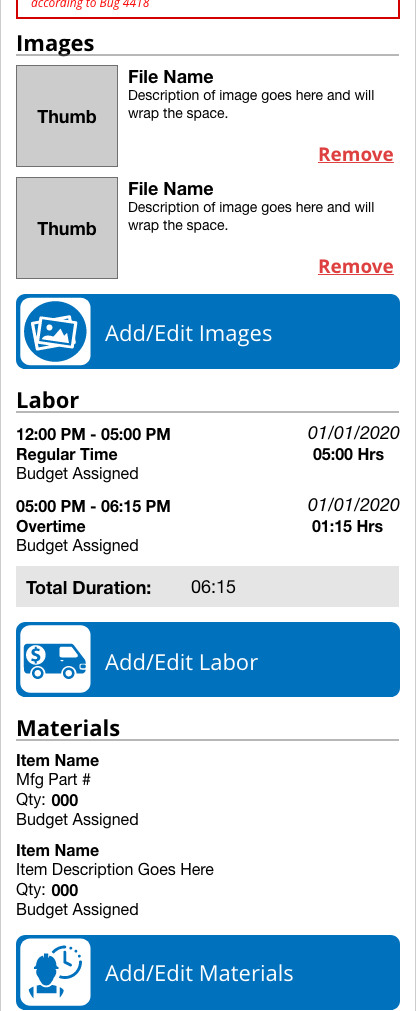
Images are an important part of explaining your work. While not required it is recommended that you attach one or two images that portray the work completed and the condition of the equipment and local environment at the time you completed your work. This goes a long way towards covering you and the contractor for the quality work you performed and the status of the equipment as you left it.
Add Service Labor
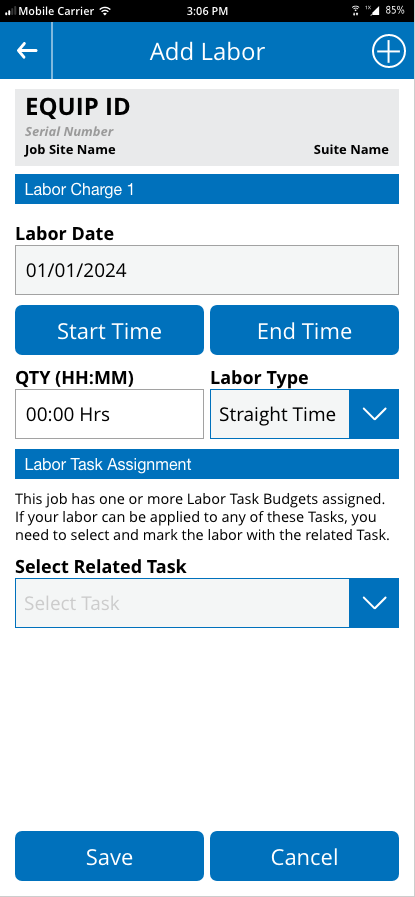
The second important part of completing service records is logging your time as labor. Equipment Manager does not use your clock time for labor reasons because Contractors need to be able to manipulate labor for billing reasons and would not be able to do so if they used your clock hours. To allow manipulation, mobile users enter labor hours on their service records to tell the system how long they spent completing work for the Client. This is then used to create labor hours that are billed to the Client on the invoice.
Labor DateThe Add Labor screen will allow you to back date your labor as needed. Typically, you will enter labor on the day it was performed and there will not be a need to adjust the date.
Start TimeClicking on the Start Time button will allow you to select the time which you started working on your equipment or job.
End TimeThe end time can be past, present or future as needed. Some users will post date their labor a few minutes into the future to account for removing themselves and equipment from the job site after completing the record.
QuantityOnce a start and end time have been recorded the system will calculate the quantity of time between the two and this is the labor amount that will be logged to the system.
Labor TypeTypically, this field is NOT edited. The option is there to change this to Overtime type labor, but such things are usually changed at billing as needed by the Contractor.
Labor Task AssignmentsTasks are like budgets in Equipment Manager and may be assigned to any job. If you see the section at the bottom of the labor screen asking you to select a task, the mobile is simply asking you to choose the topic that most closely matches the type of labor your did while completing your work. If you are working under budget tasks and you are doing work that matches more than one task, you might have to separate your labor out in relation to each task. Tasks allow the Contractor to match your labor up to labor budgets established at the start of the job and allow the contractor and mobile users to see how much of the budget has been consumed by the amount of work currently completed.

Adding Material Items
Material items are defined as items you intend to charge the Client for on the invoice that were NOT purchased using a Purchase Order. Examples may be things taken from inventory, your van, or service charges that don’t represent physical things purchased.
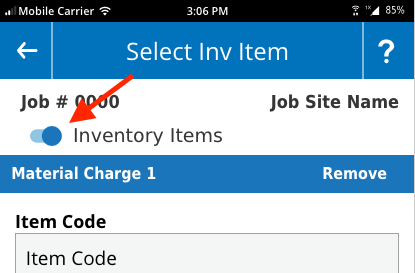
There are two types of Material items, inventory and non-inventory. The Inventory Items are things pulled from the Inventory system and have a quantity that is being deducted from a location. Non-inventory items are things recorded that are not accounted by the system. Examples of Inventory might be duct, fans, filters and such that are taken from a company storage area. Examples of non-inventory might be black iron fittings you store on your van or PVC pipe that you have but was not purchased directly for the job.
Move Inv Item to Job
By default the mobile devise will open the Add Inventory Items button to the Inventory Items screen allowing you to search for items your are assigned to add to the job as used on the job site. It is important to understand that your mobile will only search and find items that are being stored in locations that YOU are assigned to. You can search by item code, description, part number, SKU and manufacturer. Once you have populated at least one of these fields, you can click FIND PART and the phone will return all matching parts.
Once you find the part or services you are looking for you can tap the VIEW link and enter the quantity you desire to add to the job and invoice for the Client.
If you are working under budget tasks you will see a drop menu below the quantity box that asks you to select a related task. This is a required field to add items to the job.
At the bottom of the screen you will see a +New Item button that will allow you to search, find and add an additional item as needed. Adding items can be done as many times as needed.
Once you have added your item(s) to the screen, you can click the green Submit Items button which will take you back to the Service Record screen.

Adding Material Items
If the item your adding is NOT in the inventory system, they you will have to switch to entering a Material Item manually to the system. This can be done by tapping the small slider at the top of the Move Inv Item to Job screen which will cause the screen to change to the Enter Material Item screen.
Once this has been done, you can manually enter any item into the system by completing the fields for Item Code, description, quantity and unit cost. You may need to define a Task budget as needed.
Adding Packages
Packages are defined as a group of material items that have been established by the Contractor prior to being added to a job. This is a quick way to add a lot of items and services that relate to a common frequent cause. An example of a package might be a 5 Ton RTU with Curb package. This would include all the materials that are needed for a tech to install a 5 ton RTU with curb adapter. Adding a package saves the tech from having to search, find and add multiple items. Packages do have to be set up in the system by the Contractor. If you don’t see the Add Package button this simply means there are no packages available for your equipment type.
Reference Tags
This is a required field for all Service Records. Reference tags are used by the office to filter service records to make it easier to locate a specific record. Mobile users need to simply select the option that best relates to the work they did.
Private Office Notes
This text field is not required but allows the mobile user to send notes to the office that are only visible to the Contractor. Private notes are for notifying the Contractor of things relate to the job and job site. Examples might be Vicious dog, Park on the west side, need 40 ft ladder to reach roof, must notify front desk when arriving. Things that you might want the office to no but do not need to add in the public notes that are passed around to other people. These notes can then be added to special instructions that will be displayed at the beginning of work for future visits.
Checking Your Work
Anytime you add images, labor or materials to a job, the system will show you the items added on the Service Record screen. It is important that you check these things to verify what is being recorded is what you want to be recorded. The mobile will allow you to make edits to your entries as needed.
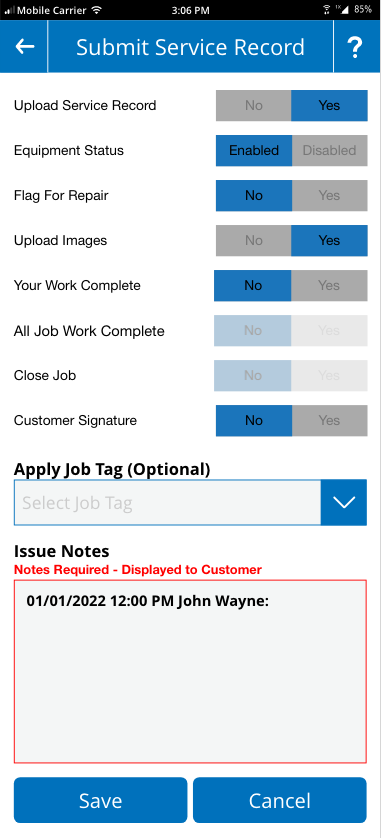
Service Record Exit Screen
When you submit your service record, you will be taken to the exit screen that contains several sliders asking simple questions. These questions have significant implications depending on the question.
Upload Service RecordThis is simply asking to you want to proceed and should default as Yes. You should not have to change this slider.
Equipment StatusThis is asking you how you intend to leave the equipment, enabled or disabled. If you are intending to disable the equipment you will be prompted with a text box at the bottom of the screen asking you to in simple terms define why you are choosing to disable the equipment.
If you disable a piece of equipment, you need to be aware that it will trigger a proposal to be generated in the system and will notify the building owner and contractor that the equipment has been disabled.
Flag for RepairTypically, you will mark a piece of equipment to be flagged for repair if you intend to come back and/or you need someone else to return and complete repairs. If you answer Yes for flaging a piece of equipment for repair, you will be prompted with a text box at the bottom of the screen asking you to in simple terms define why you are flagging the equipment.
If you flag a piece of equipment, you need to be aware that it will trigger a proposal to be generated in the system and will notify the building owner and contractor that the equipment has been flagged.
Upload ImagesThe system is asking if you want to upload the images that you have attached to your record. By default this is Yes.
Your Work CompleteIs your work complete? The system is asking if you intend to return to the job later willingly. If you answer No, the system will leave the job open, and you will stay assigned to the job. If you answer Yes, the system will remove you from the job and the job number will fall off your list of open jobs in the Time Manager system.
All Job Work is CompleteIf you have told the system in the above slider that you do Not intend to return AND you are either the last person working on the job or the only person working on the job, the system will give you the option is all work complete. If you answer yes, you will have the option to close the job.
Closing the JobIf you do not intend to come back to the job site and you have stated that all work is complete, you can then choose to close the job. If you answer Yes to this question, the system will remove you from the job and close it. This will cause the office to be notified that the work has been completed and the job is now closed. Once the job is closed, the Client can be invoiced.
Customer SignatureIf you choose Yes for this option, the mobile will display a signature screen to capture a signature from the Client. This option is not required. Signatures are attached to the record as an image and will show up in the PDF copy of the record.
Checking Completed Service Records
It is important anytime you submit something to the system that you immediately check to see that your work was uploaded properly and received by the system. This can be done one of two ways. You can click on the Public Job Notes button and verify your record notes are showing at the top of the list, or you can click on the equipment History button at the bottom of the screen and open the service record that should be at the top of the list under the service record tab.
